Digital Output
Description
Digital output are standard high-side switch which are available on several modules:
OI-Core/OI-CoreLite (x4)
OI-Discrete (x8)
OI-Mixed (x4)
Main characteristics
High continuous current: capable of handling up to 4A continuously.
High peak current: supports peaks of up to 8A.
Voltage depends on the power voltage of the module: The output voltage aligns with the Vin pin voltage (with a drop of 0.4V to 0.4 caused by internal diode).
Reverse Blocking: Safeguards against reverse current flow.
Current Readback Functionality: Allows measurement of current on each output (refer to note 1 for OI-Core/OI-CoreLite).
No Floating State: Outputs maintain stability without being left in a floating state, ensuring proper operation.
Note
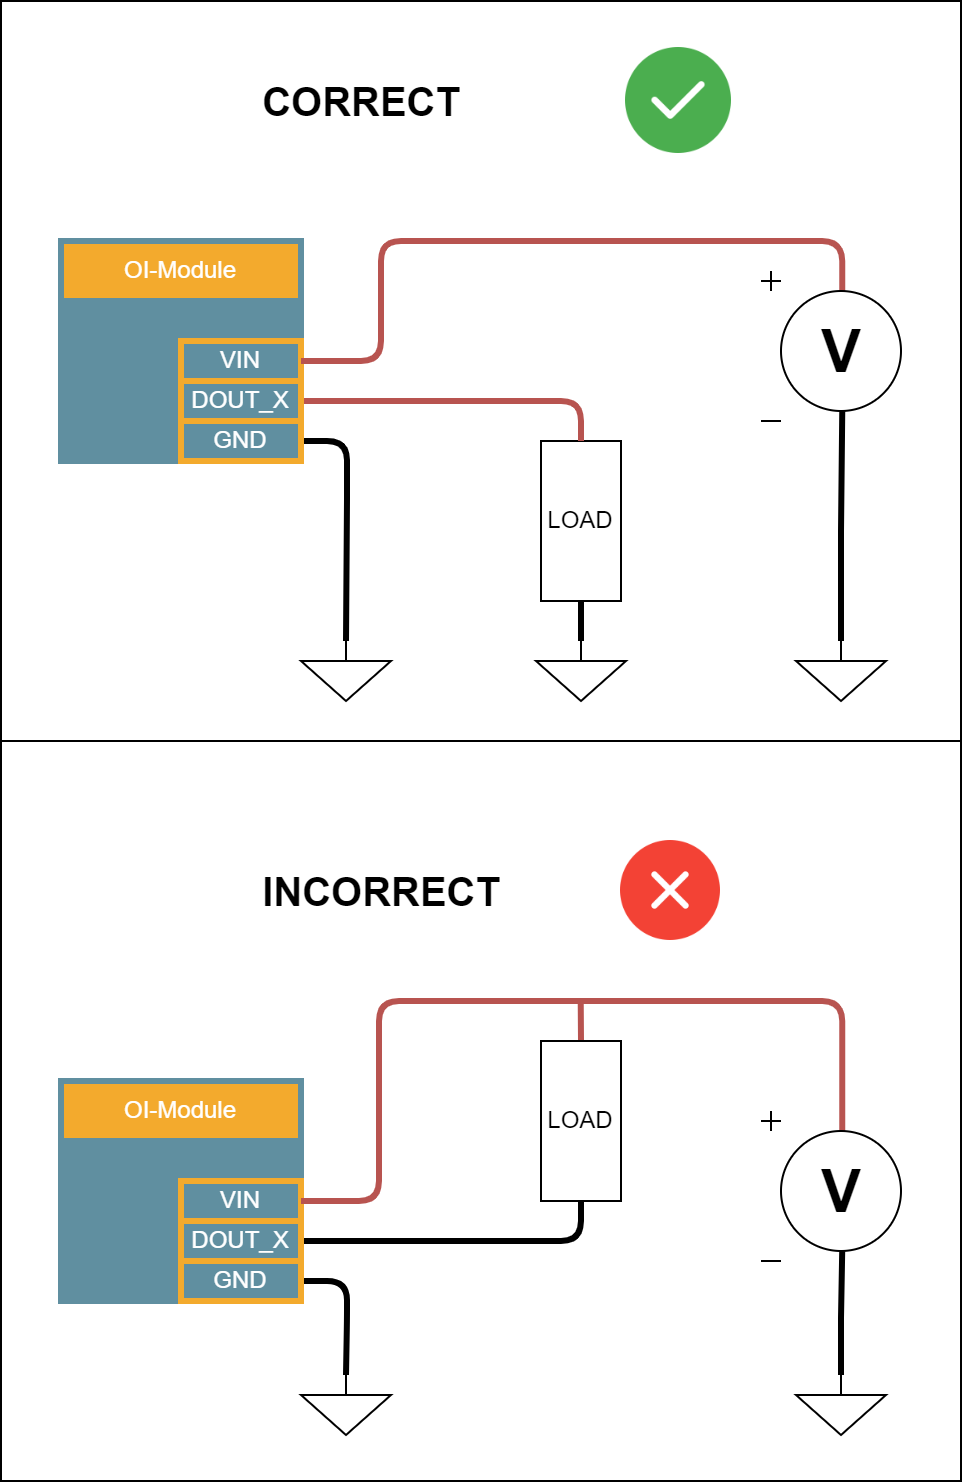
Digital outputs are designed to source current to the load. You cannot sink current. Check the example below.
Characteristics
Requirements |
Type |
Value |
|---|---|---|
Voltage output high at 0.5A |
Vcc - 0.4V |
|
Voltage output high at 5A |
Vcc - 0.6V |
|
Maximum voltage |
30V |
|
Maximum current (for each output) |
4A |
|
Maximum current (total) |
8A |
See note 1 for OI-Core |
Peak current (for each output) |
5A |
for 1s maximum |
Maximum Switching frequency |
10kHz |
Note
Note 1: On OI-Core and OI-CoreLite modules, the maximum current on all output is 6A.
Note
On all modules, you can read the value of the current on each output as an analog value. On OI-Core/OI-CoreLite, you can only get an indication to know if the current is above 4A (getDigitalCurrent will return ‘1’) or below 4A (getDigitalCurrent will return ‘0’).
Code examples
The example code above demonstrates how to set the value of an output on an OI-Core module.
#include "OpenIndus.h"
#include "Arduino.h"

/* Instanciate */
OICore core;

void setup(void)
{
    /* Nothing to do in setup */
}

void loop(void)
{
    /* Activate all */
    core.digitalWrite(DOUT_1, HIGH);
    core.digitalWrite(DOUT_2, HIGH);
    core.digitalWrite(DOUT_3, HIGH);
    core.digitalWrite(DOUT_4, HIGH);
    delay(1000);

    /* Deactivate all */
    core.digitalWrite(DOUT_1, LOW);
    core.digitalWrite(DOUT_2, LOW);
    core.digitalWrite(DOUT_3, LOW);
    core.digitalWrite(DOUT_4, LOW);
    delay(1000);
}
The example code above demonstrates how to set the value of an output on an OI-Discrete module. It also shows how to read the current on an output.
#include "OpenIndus.h"
#include "Arduino.h"

/* Instanciate */
OIDiscrete discrete;

void setup(void)
{
    Serial.begin(115200);

    /* Set DOUT 1 to high */
    discrete.digitalWrite(DOUT_1, 1);
    discrete.digitalWrite(DOUT_2, 1);
    discrete.digitalWrite(DOUT_3, 1);
    discrete.digitalWrite(DOUT_4, 1);
    discrete.digitalWrite(DOUT_5, 1);
    discrete.digitalWrite(DOUT_6, 1);
    discrete.digitalWrite(DOUT_7, 1);
    discrete.digitalWrite(DOUT_8, 1);
}

void loop(void)
{
    /* Print value in monitor */
    Serial.printf("DOUT Sensor 1: %.2fA\t 2: %.2fA\t 3: %.2fA\t 4: %.2fA\t 5: %.2fA\t 6: %.2fA\t 7: %.2fA\t 8: %.2fA\n", \
        discrete.getOutputCurrent(DOUT_1),\
        discrete.getOutputCurrent(DOUT_2),\
        discrete.getOutputCurrent(DOUT_3),\
        discrete.getOutputCurrent(DOUT_4),\
        discrete.getOutputCurrent(DOUT_5),\
        discrete.getOutputCurrent(DOUT_6),\
        discrete.getOutputCurrent(DOUT_7),\
        discrete.getOutputCurrent(DOUT_8));

    /* Wait for 200ms before reading value again */
    delay(200);
}
If you want to get current on OI-Core, you will get ‘0’ is current is below 4A and ‘1’ if current is above 4A.
#include "OpenIndus.h"
#include "Arduino.h"

/* Instanciate */
OICore core;

void setup(void)
{
    Serial.begin(115200);

    /* Set DOUT 1 to high */
    core.digitalWrite(DOUT_1, 1);
    core.digitalWrite(DOUT_2, 1);
    core.digitalWrite(DOUT_3, 1);
    core.digitalWrite(DOUT_4, 1);
}

void loop(void)
{
    /* Print value in monitor */
    Serial.printf("DOUT Sensor 1: %u\t 2: %u\t 3: %u\t 4: %u\n", \
        core.outputIsOvercurrent(DOUT_1),\
        core.outputIsOvercurrent(DOUT_2),\
        core.outputIsOvercurrent(DOUT_3),\
        core.outputIsOvercurrent(DOUT_4));

    /* Wait for 200ms before reading value again */
    delay(200);
}
Software API
-
class DigitalOutputsInterface
Digital Outputs Interface class.
Public Functions
-
inline virtual ~DigitalOutputsInterface()
Virtual destructor for DigitalOutputsInterface.
-
virtual void digitalWrite(DOut_Num_t num, bool level) = 0
Set an output at high or low level.
- Parameters:
num – DOUT to drive.
level – DOUT level, HIGH or LOW.
-
virtual void toggleOutput(DOut_Num_t num) = 0
Toggle a digital output.
- Parameters:
num – DOUT to toggle
-
virtual void outputMode(DOut_Num_t num, DOut_Mode_t mode) = 0
Configure output mode.
- Parameters:
num – output number
mode – output mode [DIGITAL, PWM]
-
virtual void setPWMFrequency(DOut_Num_t num, uint32_t freq) = 0
Set the frequency value of PWM for a digital output.
- Parameters:
num – DOUT to set
freq – PWM frequency [50 - 1000 Hz]
-
virtual void setPWMDutyCycle(DOut_Num_t num, float duty) = 0
Set the duty cycle value of PWM for a digital output.
- Parameters:
num – DOUT to set
duty – Duty cycle in percentage [0-100]
-
virtual float getOutputCurrent(DOut_Num_t num) = 0
Get the current of a digital output.
- Parameters:
num – DOUT to get
- Returns:
current in Ampere
-
virtual int outputIsOvercurrent(DOut_Num_t num) = 0
Get the overcurrent status of a digital output.
- Parameters:
num – DOUT to get
- Returns:
1 if overcurrent, 0 if not
-
virtual void setOvercurrentThreshold(float threshold, float thresholdSum = 8.0f) = 0
Set the Overcurrent Threshold.
- Parameters:
threshold –
totalThreshold –
-
virtual void attachOvercurrentCallback(void (*callback)(void*), void *arg = NULL) = 0
Attach a callback function to be called when an overcurrent is detected.
- Parameters:
callback – Function pointer to the callback function
arg – argument for the handler
-
virtual void detachOvercurrentCallback(void) = 0
Detach the overcurrent callback function.
-
inline virtual ~DigitalOutputsInterface()